Dashie is a free, lightweight Android app designed for hosting Home Assistant dashboards. It provides a clean, full-screen experience with a compact sidebar for quick controls, a Control Center for managing all settings, and optional voice control with the "Hey Dashie" wake word.
Getting Started
Configuring Your Home Assistant URL
When you first launch Dashie, you'll configure your Home Assistant connection. There are 2 options:
- Enter the URL for your dashboard including parameters to hide unwanted items
- Auto-detect: Dashie scans for your HA instance on the local network. If it finds it, just add your dashboard name (the one in the URL with a "-" in it) and tap Save & Load. If it doesn't find it, enter your HA base URL manually.
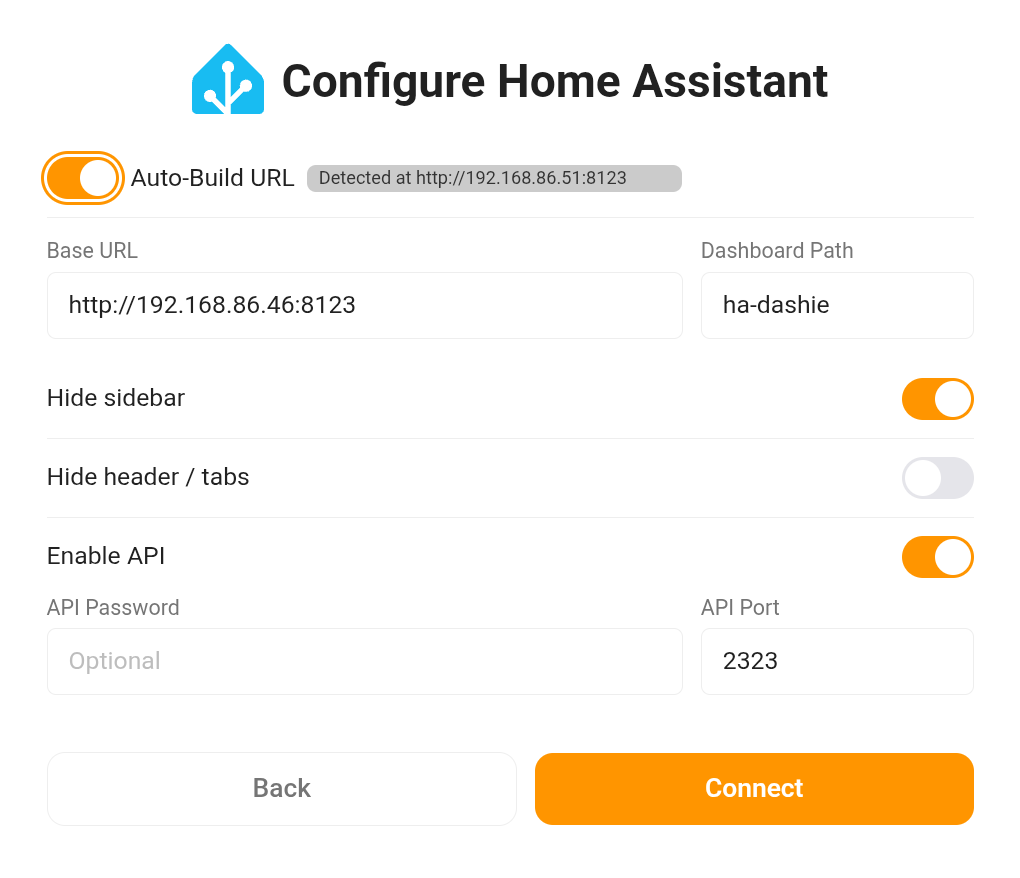
The configuration screen also includes several display and integration options:
- Hide Sidebar — Removes the Home Assistant sidebar from your dashboard for a cleaner view
- Hide Header/Tabs — Removes the header and tab navigation for a full-screen dashboard experience
- Enable API — Turns on the REST API so you can control your tablet from Home Assistant (see Using the API)
After saving your URL, you'll be taken to a Home Assistant login screen. Once logged in, your dashboard will display full-screen.
Permissions
Dashie will request the following Android permissions. You can grant or skip each one and change them later in Android Settings.
- Camera — Used for motion detection wake and optional RTSP video streaming
- Microphone — Required for "Hey Dashie" voice control (optional feature)
- Notifications — Required for background services:
- Keeping the REST API server running for Home Assistant integration
- Dashboard recovery if Android forces an unintended closure of the app
- Return-to-dashboard alerts when navigating away
- Screen Brightness — Allows Dashie to control screen brightness for auto-brightness and voice commands like "dim the screen"
The Sidebar
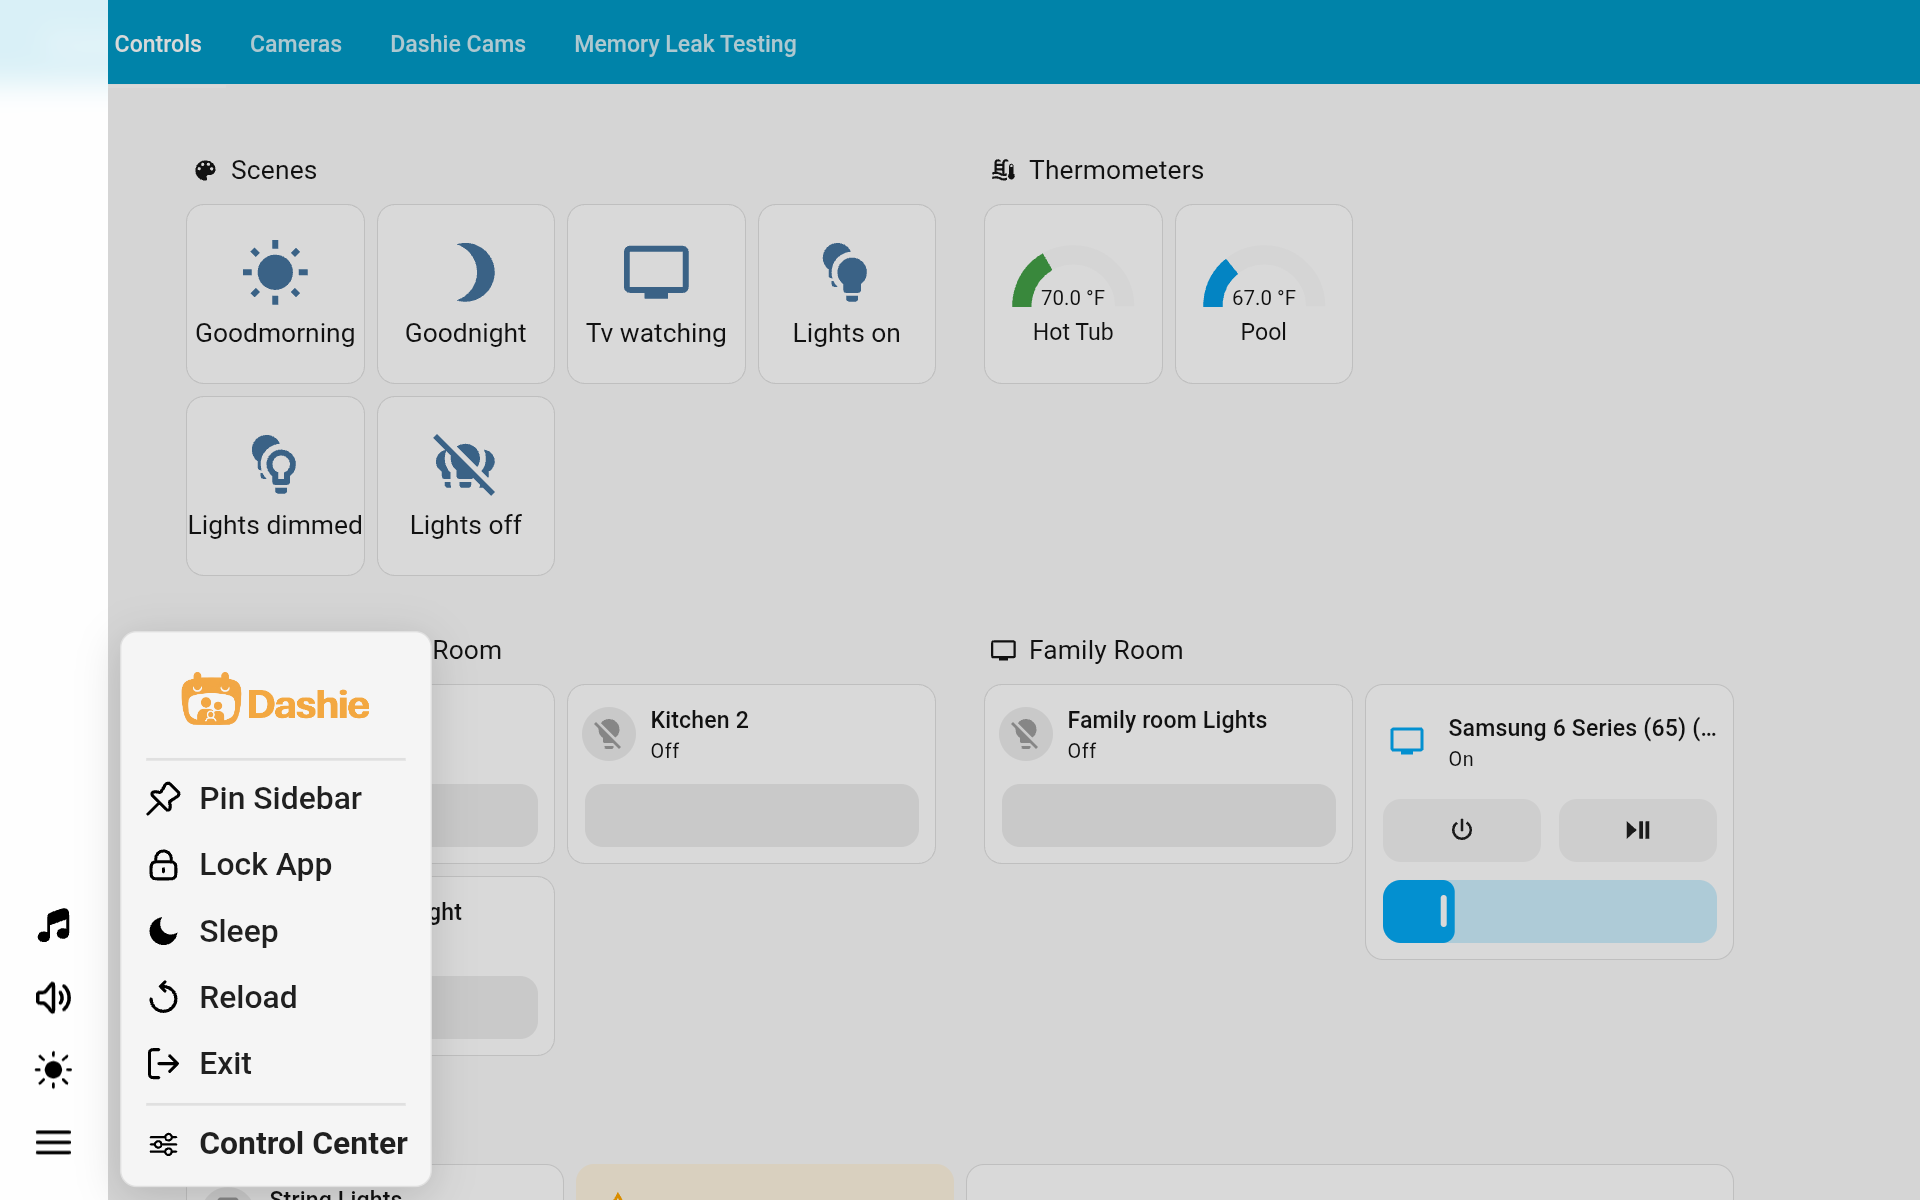
The sidebar sits along the left edge of the screen as a compact icon strip, giving you instant access to essential controls without leaving your dashboard. Swipe from the left edge to reveal it, or pin it to keep it visible.

Control Center
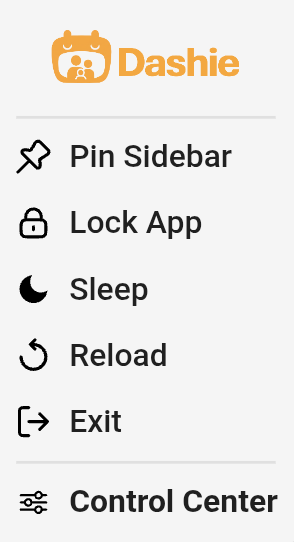
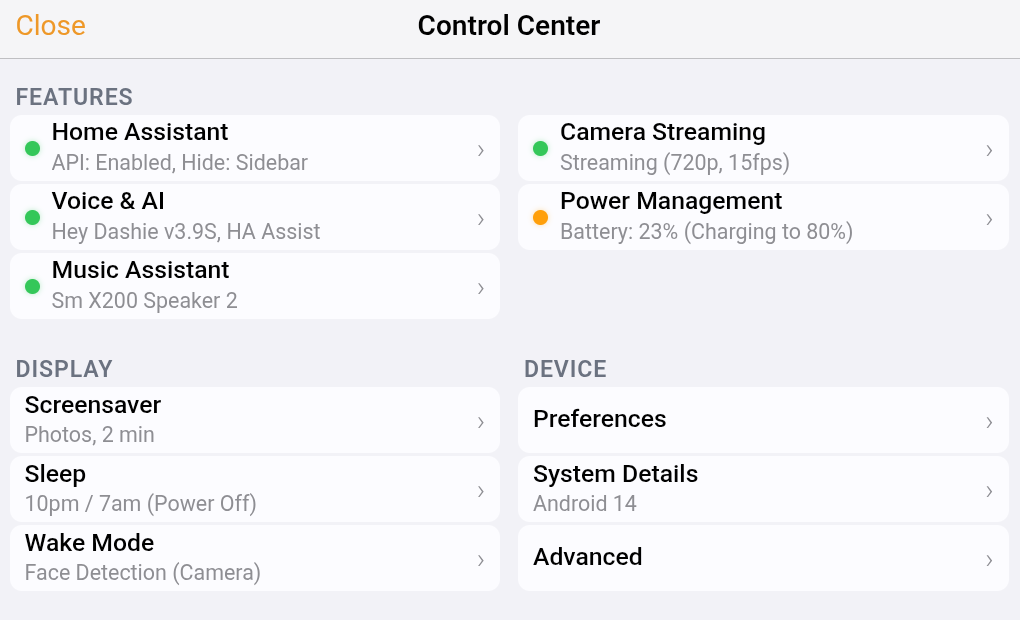
The Control Center is your hub for all Dashie settings and configuration. Access it by tapping Control Center in the Quick Functions popup on the sidebar.
Home Assistant
Configure your HA dashboard URL, toggle sidebar and header visibility, and enable the REST API for remote control.
Display & Screensaver
Set up screensaver modes (dim, black, photos, URL, or third-party app), configure sleep timers, auto-brightness, and motion detection wake settings.
Voice & AI
Enable "Hey Dashie" wake word, choose your voice handler, configure response behavior, and manage wake word models.
Audio & Video
Control default volume levels, configure RTSP video streaming, and set up Music Assistant speaker options.
Power Management
Configure charging thresholds to manage battery health on always-plugged-in tablets. See details below.
System & Advanced
Access performance settings, refresh schedules, diagnostic tools, start-on-boot configuration, and device information.
Voice Control (Upgrade)
Voice control with "Hey Dashie" wake word detection is available as a $14.99 upgrade. Once enabled, you can control your Home Assistant devices hands-free.
Voice control features:
- Local wake word detection - "Hey Dashie" is processed on-device for speed
- Home Assistant integration - Uses HA's Assist pipeline for command processing
- Visual feedback - On-screen indicators show listening and processing states
For setup instructions, see our Voice Control Setup Guide.
Dashie Integration
Dashie has a custom HACS integration for Home Assistant that gives you full control over your tablets from the HA dashboard. With the integration installed, you can control your tablet's screen, camera, audio, screensaver, and more — all from Home Assistant automations and the dashboard UI.
The integration provides entities for battery status, screen state, and brightness, and supports services for all API commands. It also enables streaming your tablet's camera feed as a camera entity in Home Assistant.
For installation and setup instructions, see our Dashie Integration Setup Guide.
Music Assistant Integration
Dashie integrates with Music Assistant to turn your tablets into speakers for whole-home audio. With Music Assistant configured, you can play music on any Dashie tablet, group speakers together, and control playback directly from the sidebar.
Music playback controls appear in the sidebar for quick access, and you can select which speaker or speaker group to use. The Control Center provides additional options for default speaker selection and Music Assistant configuration.
For setup instructions, see our Music Assistant Setup Guide.
Tips & Tricks
Lock App (Kiosk Mode)
The "Lock App" toggle in the sidebar enables full kiosk lockdown mode:
- Hides the navigation bar and status bar for a clean, full-screen display
- Prevents the power button and volume buttons from exposing the settings menu
- Blocks the notification shade from being pulled down (prevents access to Quick Settings)
- Keeps users focused on your Home Assistant dashboard
On most tablets, when you first enable this setting, Android will show a confirmation dialog asking you to allow screen pinning. Once confirmed, the feature works automatically on future toggles.
Exiting Lock App Mode
To exit, open the Dashie sidebar and click "Unlock App". If you get stuck, hold the Back and Recent Apps buttons simultaneously for a few seconds to exit screen pinning.
PIN Recovery
If you forget your PIN, you are able to set a recovery email address that can send it to you. If you do not enter a recovery address then the PIN can be reset with a long press on the Dashie logo in the sidebar (5 seconds).
Setting Up Device Owner
For the best kiosk experience, you can set Dashie as the device owner using ADB. This is optional but provides three key benefits:
- Silent screen pinning — Eliminates the "App is pinned" notification toast that normally appears when you enable Lock App mode
- Remote device reboot — Enables the
rebootDeviceAPI command to reboot the tablet without requiring root access - Reliable camera motion detection with the screen off — On aggressive devices (e.g. Honor/MagicOS) that revoke camera access or kill the app while the screen is off, device owner status keeps Dashie's camera/motion service resident
Not possible on Amazon Fire tablets and Fire TV
Android allows only one owner per device, and Fire OS claims that slot for itself: every Fire device ships with Amazon's own Parental Controls app already set as the profile owner. However, on Fire tablets, Lock App uses immersive mode rather than screen pinning, so there is no "App is pinned" toast to eliminate and Device Owner isn't critical.
Requirements
- A computer with ADB installed
- USB debugging enabled on the tablet
- No other accounts on the device — Android requires all accounts (Google, Samsung, etc.) to be removed before setting a device owner. You can re-add them afterward.
Setting Device Owner
Connect your tablet via USB and run:
adb shell dpm set-device-owner com.dashieapp.Dashie/com.dashieapp.Dashie.halite.DashieDeviceAdminReceiver
Once set, Lock App mode will activate silently without any Android system prompts or notifications. (Fire devices are the exception — see above.)
Beta / sideload builds: the package name carries a .sideload suffix, so use the matching component —
com.dashieapp.Dashie.sideload/com.dashieapp.Dashie.halite.DashieDeviceAdminReceiver.
If set-device-owner reports "ComponentName not found," you've used the wrong package name for your installed build.
Removing Device Owner
If you need to remove device owner status later, you can do so from Dashie's Control Center under Advanced settings, or by running:
adb shell dpm remove-active-admin com.dashieapp.Dashie/com.dashieapp.Dashie.halite.DashieDeviceAdminReceiver
Power Management
Tablets mounted as permanent dashboards are typically plugged in 24/7, which can degrade battery health over time. Dashie includes built-in power management to address this without requiring Home Assistant automations or smart plugs.
In the Control Center under Power Management, you can:
- Set a charge limit — Stop charging when the battery reaches a target level (e.g., 80%)
- Set a resume threshold — Resume charging when the battery drops below a set level (e.g., 20%)
- View battery health status — Monitor charging cycles and battery condition
This keeps your tablet's battery cycling within a healthy range automatically, extending its lifespan significantly.
Auto-Launch Options
There are two ways to make Dashie launch automatically when your tablet starts:
Option 1: Set as Default Launcher (Recommended for Standard Android)
On most Android tablets (not Fire tablets), you can set Dashie as your default home/launcher app. This is the simplest approach and doesn't require any ADB commands.
- Open your tablet's Settings
- Go to Apps (or "Apps & notifications")
- Tap Default apps (or "Choose default apps")
- Select Home app (or "Launcher")
- Choose Dashie
Once set as the launcher, Dashie will automatically start when the tablet boots and when you press the home button.
Note about "Start on Boot" setting
If you set Dashie as your default launcher, you do not need to enable the "Start on Boot" toggle in the sidebar. The launcher setting takes precedence and handles auto-launch automatically.
Option 2: Fire Tablet Setup (ADB Commands Required)
Fire tablets have a locked-down launcher that can't be changed through settings. Use these ADB commands to enable auto-launch. Connect your tablet via USB and run:
# Grant overlay permission (required for background activity starts)

adb shell appops set com.dashieapp.Dashie SYSTEM_ALERT_WINDOW allow


# Disable lock screen ads (Amazon Special Offers)

adb shell settings put global LOCKSCREEN_AD_ENABLED 0


# Disable lock screen entirely (no swipe to unlock)

adb shell locksettings set-disabled true
After running these commands, enable "Start on Boot" in the Dashie sidebar under System settings.
Note
Even with these settings enabled, Fire tablets require approximately 60 seconds after power on to complete their system loading process before Dashie will start.
Performance & Diagnostics
In the Advanced Menu in Settings there is a section for managing device performance and diagnosing issues. Home Assistant dashboards often have graphical displays that accumulate memory over time, which can lead to dashboard crashes if the Webview displaying the dashboard is not refreshed periodically. By default, Dashie will refresh your dashboard at 3am each night or if your screensaver has been active for 2 hours. It will also refresh your dashboard if the RAM utilization gets too high (memory pressure refresh). These parameters can be adjusted here.
Sending a Diagnostic Report
If you hit an issue and we ask for details, the fastest way to help us debug is to send a diagnostic report. In the Advanced Menu under Performance & Diagnostics, tap Send Diagnostics (or Copy to put the report on your clipboard so you can paste it into an email).
The report is a single bundle that captures everything we need in one shot:
- Device & app info — model, Android version, WebView version, Dashie build
- Setup & permissions — battery-optimization exemption, Device Owner / Device Admin status, overlay, exact-alarm, brightness (write-settings), camera and notification permissions
- Camera & motion — RTSP streaming settings, encoder capabilities, and motion/face wake mode
- Display, memory, and dashboard analysis
- Event history — the on-device log (survives restarts and reboots), so overnight issues are captured even if you send the report the next morning
Diagnostic reports are used only for troubleshooting and contain no account credentials or personal dashboard data. The Setup & Permissions section is especially useful when diagnosing devices with aggressive power management (for example HONOR/MagicOS or Xiaomi), since it tells us at a glance which keep-alive permissions are in place.
Using the API
Dashie includes a REST API that runs on port 2323.
It is compatible with Fully Kiosk's integration, but supports more functionality including the brightness settings, PIN control, and RTSP video streaming.
A Dashie HACS integration is also available — see Dashie Integration above.
Enabling the API
Tap ☰ → Control Center → Dashboard config, and under Device API toggle on "Enable API". (Dashboard config appears once Dashie is set up with a Home Assistant dashboard or a custom dashboard URL.) You can optionally set a password for authentication. Once enabled, the API is accessible at:
http://<device-ip>:2323/?cmd=<command>&password=<your-password>
Connecting to Home Assistant
To add Dashie to Home Assistant using the Fully Kiosk integration (an alternative to the Dashie integration, which is available through HACS):
- Go to Settings → Devices & Services → Add Integration
- Search for "Fully Kiosk Browser"
- Enter your device's IP address
- Set the port to
2323 - Enter your API password (leave blank if none set)
Supported Commands
Dashie supports the most commonly-used Fully Kiosk API commands:
| Command | Description |
|---|---|
deviceInfo |
Returns device state (battery, screen, network, etc.) - polled by HA every 30-60s |
listSettings |
Returns all configurable settings - required by HA Fully Kiosk integration during setup |
screenOn |
Turn screen on |
screenOff |
Turn screen off |
setStringSetting |
Set configuration (supports screenBrightness 0-255, startUrl, motionWakeMode, textScaling 50-200%) |
setBooleanSetting* |
Set boolean configuration (supports hideSidebar, hideHeader, keepScreenOn, startOnBoot, autoBrightness, rtspEnabled, rtspSoftwareEncoding) |
setAudioVolume |
Set volume (level 0-100, stream 1-5) |
textToSpeech |
Speak text using Android TTS |
stopTextToSpeech |
Stop TTS playback |
loadUrl |
Navigate to a specific URL |
loadStartUrl |
Reload the configured start URL |
restartApp |
Restart Dashie |
rebootDevice* |
Reboot the Android device (requires device owner — no root needed) |
toForeground |
Bring app to foreground |
refreshWebView* |
Refresh the WebView (reload HA dashboard) |
startScreensaver |
Dim the screen (enter screensaver mode) |
stopScreensaver |
Wake the screen (exit screensaver mode) |
setScreensaverMode* |
Set screensaver type: dim, black, url, or photos |
setPhotoSource* |
Set photo source: ha_media, local, google, or immich |
setHaMediaFolder* |
Set Home Assistant media folder path for photo screensaver |
triggerMotion |
Simulate motion detection (resets sleep timer) |
playSound |
Play audio from a URL |
stopSound |
Stop audio playback |
pauseSound* |
Pause current audio playback |
resumeSound* |
Resume paused audio |
seekSound* |
Seek audio to position (requires position in seconds) |
muteAudio* |
Mute all audio |
unmuteAudio* |
Unmute audio |
getCamshot |
Capture image from camera (returns JPEG) |
startRtspStream* |
Start RTSP camera stream on port 8554 |
stopRtspStream* |
Stop RTSP camera stream |
getRtspStatus* |
Get RTSP stream status (running, resolution, clients) |
getRtspConfig* |
Get RTSP configuration settings |
setRtspResolution* |
Set RTSP resolution (e.g., 1280x720) |
setRtspFps* |
Set RTSP frame rate (1-30) |
setRtspBitrate* |
Set RTSP bitrate in bps |
startApplication |
Launch another app by package name (see Launch Apps with the Dashie API) |
setOverlayMessage |
Show a toast/overlay message |
setDarkMode* |
Enable/disable dark mode (true/false) |
getDarkMode* |
Get current dark mode state |
setPin* |
Set PIN for kiosk lock |
clearPin* |
Remove PIN protection |
getPinStatus* |
Check if PIN is configured |
lockKiosk |
Lock kiosk mode (hide sidebar controls) |
unlockKiosk |
Unlock kiosk mode (show sidebar controls) |
clearCache |
Clear WebView cache |
clearWebstorage |
Clear WebView local storage |
* Not supported by Fully Kiosk's integration
Example API Calls
You can test the API directly from your browser or with curl:
# Get device info

curl "http://192.168.1.100:2323/?cmd=deviceInfo&type=json&password=mypass"


# Turn screen on

curl "http://192.168.1.100:2323/?cmd=screenOn&password=mypass"


# Set brightness to 50%

curl "http://192.168.1.100:2323/?cmd=setStringSetting&key=screenBrightness&value=128&password=mypass"


# Enable auto-brightness

curl "http://192.168.1.100:2323/?cmd=setBooleanSetting&key=autoBrightness&value=true&password=mypass"


# Set motion wake mode to camera

curl "http://192.168.1.100:2323/?cmd=setStringSetting&key=motionWakeMode&value=camera&password=mypass"


# Set WebView text scaling to 125%

curl "http://192.168.1.100:2323/?cmd=setStringSetting&key=textScaling&value=125&password=mypass"


# Set screensaver to photos mode

curl "http://192.168.1.100:2323/?cmd=setScreensaverMode&mode=photos&password=mypass"


# Set photo source to Immich

curl "http://192.168.1.100:2323/?cmd=setPhotoSource&source=immich&password=mypass"


# Speak a message

curl "http://192.168.1.100:2323/?cmd=textToSpeech&text=Hello%20world&password=mypass"


# Refresh the dashboard

curl "http://192.168.1.100:2323/?cmd=refreshWebView&password=mypass"


# Mute audio

curl "http://192.168.1.100:2323/?cmd=muteAudio&password=mypass"


# Reboot the device (requires device owner)

curl "http://192.168.1.100:2323/?cmd=rebootDevice&password=mypass"


# Check motion/face detection status (included in deviceInfo)

curl "http://192.168.1.100:2323/?cmd=deviceInfo&type=json&password=mypass" | jq '.motionDetected, .faceDetected'


# Pause/resume sound

curl "http://192.168.1.100:2323/?cmd=pauseSound&password=mypass"

curl "http://192.168.1.100:2323/?cmd=resumeSound&password=mypass"
deviceInfo Response
The deviceInfo command returns comprehensive device information. Home Assistant polls this automatically every 30-60 seconds when using the Fully Kiosk integration.
Key fields include:
- Device: deviceID, deviceName, deviceModel, androidVersion, isFireTablet
- Battery: batteryLevel, plugged, plugSource
- Screen: screenOn, screenBrightness, ambientLight, isInScreensaver
- Lock States: kioskLocked, lockAppExit, lockSettings, hasPinSet
- Display: isDarkMode, supportsDarkMode, textScaling
- Screensaver: screensaverMode (dim/black/url/photos), photoSource, haMediaFolder
- Motion & Face: motionDetected, faceDetected, motionWakeMode (disabled/brightness/camera)
- Settings: hideSidebar, hideHeader, keepScreenOn, startOnBoot, autoBrightness
- RTSP: rtspEnabled, rtspSoftwareEncoding
- URLs: currentPage, startUrl
- Network: ip4, Mac, wifiSignalLevel, ssid
- Storage: internalTotal, internalFree, externalTotal, externalFree
Configuration Keys Reference
setStringSetting keys:
| Key | Values | Description |
|---|---|---|
screenBrightness |
0-255 | Screen brightness level |
startUrl |
URL string | Dashboard URL to load on start |
motionWakeMode |
disabled, brightness, camera | How motion detection wakes screen |
textScaling |
50-200 | WebView zoom percentage |
setBooleanSetting keys:
| Key | Description |
|---|---|
hideSidebar |
Hide the Home Assistant sidebar |
hideHeader |
Hide the Home Assistant header/tabs |
keepScreenOn |
Keep screen on while app is active |
startOnBoot |
Auto-start app on device boot |
autoBrightness |
Enable auto brightness based on light sensor |
rtspEnabled |
Enable RTSP camera streaming |
rtspSoftwareEncoding |
Use software encoding for RTSP (slower but more compatible) |
Need Help?
If you have questions or run into issues, we're here to help: