Music Assistant is a free, open-source music library manager for Home Assistant that connects all your music services in one place. With Dashie's built-in Sendspin speaker support, your Dashie tablets automatically appear as speakers in Music Assistant — no extra integration or login required.
About the Dashie Music Player
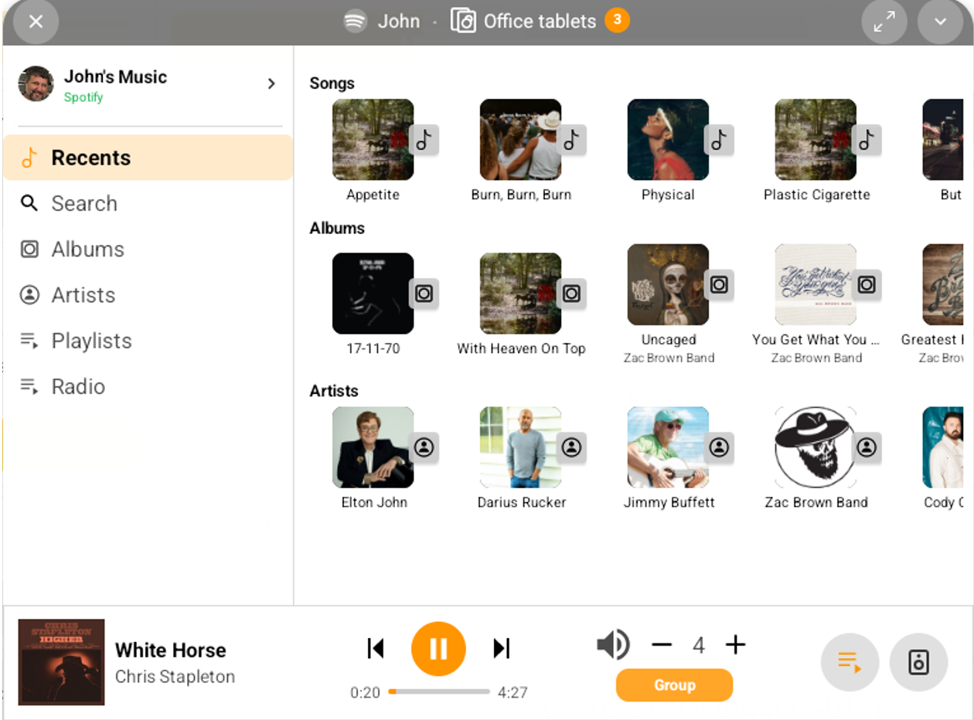
Dashie's music player is opened from the sidebar in one of two forms: pop-up player or full screen. These float over your HA dashboard and give you control over your music regardless of what dashboard page you're on. The player can also be minimized to a small bar that you can reposition over your dashboard in an unobtrusive place.
Within the players you have access to switching Music Assistant profiles and can select music from albums, artists, playlists, recent music, or search for music. You can also control the speakers throughout your house.
Dashie's player uses the Sendspin protocol, so it can synchronize with other Sendspin players and your tablet is automatically discovered as a speaker/player within Music Assistant.
What You'll Be Able to Do
Stream music from Spotify, YouTube Music, local files, and other sources directly to your Dashie tablets. Group multiple Dashie devices for synchronized multi-room audio. Control playback from the native on-screen music player, the Music Assistant UI, Home Assistant automations, or voice commands.
Prerequisites
- Home Assistant with the Music Assistant add-on (version 2.7 or later)
- Dashie installed on your Android device (version 2.3 or later)
- Your Dashie tablet and Music Assistant server on the same local network
No HA Integration Required
Unlike the previous setup method, the Sendspin approach does not require the Dashie Home Assistant integration or a Music Assistant login. Your Dashie tablet connects directly to Music Assistant's Sendspin server and registers itself as a speaker automatically.
How It Works
Dashie uses the Sendspin protocol — Music Assistant's native multi-room audio protocol (built-in since MA 2.7). When you enable the music player in Dashie, it connects to Music Assistant's Sendspin server over a WebSocket and registers as a speaker. Music Assistant then streams synchronized audio directly to your tablet alongside metadata like track info, album art, and playback state.
Audio flows directly from Music Assistant to your Dashie tablet via Sendspin:
Spotify, YT Music, etc.
Sendspin Server
Sendspin Speakers
Sendspin provides synchronized audio, metadata, playback state, and volume control over a single WebSocket connection.
Because Sendspin is Music Assistant's native speaker protocol, your Dashie tablets can be grouped with other Sendspin-compatible speakers including Chromecast (via Sendspin Bridge), AirPlay devices, and other Dashie tablets for synchronized multi-room playback.
Part 1: Install Music Assistant
Music Assistant runs as a Home Assistant add-on. If you already have it installed, skip to Part 2.
Add the Music Assistant Repository
In Home Assistant, go to Settings → Add-ons → Add-on Store (bottom right). Click the three-dot menu (⋮) in the top right and select Repositories.
Paste the following URL and click Add:
https://github.com/music-assistant/home-assistant-addon
Install the Add-on
Close the repositories dialog. Refresh the page, then scroll down or search for Music Assistant in the Add-on Store. Click on it, then click Install.
Start the Add-on
After installation completes, click Start. Optionally enable Start on boot and Watchdog so Music Assistant runs automatically.
Set Up the Integration
After starting the add-on, Home Assistant should automatically discover Music Assistant and prompt you to set it up. If not, go to Settings → Devices & Services → Add Integration and search for Music Assistant. Click Configure and follow the prompts.
Part 2: Add Your Music Sources
Before setting up speakers, connect at least one music source so you have something to play. Open the Music Assistant UI from the Home Assistant sidebar.
Open Settings
In the Music Assistant UI, click the gear icon or go to Settings → Music Providers.
Add a Music Provider
Click Add Music Provider and choose from the available options:
• Spotify — Requires Spotify Premium
• YouTube Music — Free or Premium
• Local Files (Filesystem) — Music files on your HA server
• Radio Browser — Free internet radio stations
• And many more
Authenticate and Sync
Follow the authentication steps for your chosen provider. Once connected, Music Assistant will begin syncing your library. This may take a few minutes depending on the size of your library.
Part 3: Setting Up Music Profiles
Music Assistant supports multiple user profiles, each with their own music provider connections. This is useful for families where each person has their own Spotify or YouTube Music account — each person gets their own library, recommendations, and playback history.
Creating Profiles
In Music Assistant, go to Settings → Users to create a profile for each family member. Each profile can have its own set of music providers linked to it.
Adding Per-Person Music Providers
For each profile, you'll add that person's music provider (e.g., their Spotify account) and filter their access to only that provider. This ensures that when they use the Dashie music player, they see their own library and playlists.
Add a Music Provider for the Profile
Go to Settings → Music Providers → Add Music Provider. Select the provider type (e.g., Spotify) and authenticate with that person's account credentials.
Give it a descriptive name like "John's Spotify" so you can identify it later.
Assign the Provider to a Profile
After adding the provider, go to Settings → Users, select the profile, and configure which music providers that profile has access to. Filter it so each person only sees their own provider.
Watch Out for Auto-Authentication
When adding multiple members' music providers in the same browser session, the provider's OAuth flow may auto-authenticate using the previously logged-in account. To avoid this, use an incognito/private browser window when adding each person's provider, or log out of the provider (e.g., Spotify) between each setup.
Switch Profiles in Dashie
In the Dashie music player, tap the profile name at the top of the player to switch between family members. Each person's library, playlists, and recommendations will load when their profile is selected.
Part 4: Enable the Music Player in Dashie
This is where Dashie's Sendspin integration makes things simple. Just enable the music player setting and your tablet automatically registers as a speaker in Music Assistant.
Open Dashie Settings
On your Dashie tablet, open the sidebar and tap the Settings gear icon.
Enter the Music Assistant Server Address
Under the Music section, enter your Music Assistant server address. This is typically
your Home Assistant IP address with port 8095 — for example, 192.168.1.100:8095.
Enable the Music Player
Toggle Show Music Player to on. Dashie will prompt you to restart — tap Restart.
After restarting, Dashie connects to Music Assistant's Sendspin server and registers itself as a speaker. You should see your tablet appear in Music Assistant's player list within a few seconds.
Verify in Music Assistant
Open the Music Assistant UI and go to Settings → Players. Your Dashie tablet should now appear in the player list. You can rename it here if the default device name isn't descriptive enough.
Multiple Dashie Tablets
Each Dashie device registers as its own Sendspin speaker. Enable the music player on each tablet and they'll all appear as separate speakers that can be grouped for synchronized multi-room playback.
Part 5: Play Music
With the music player enabled, you can control playback in several ways.
From the Dashie Music Player
When music starts playing on your Dashie speaker, the native music player card appears on screen with:
- Album art, track title, and artist
- Play/pause, next, and previous controls
- Volume slider
- Speaker group drawer — tap the speaker name to see all available speakers, check/uncheck to add or remove them from the group
- Recently played strip — scroll through and tap to replay
The player can be dragged to any position on screen, minimized to a small pill, or expanded to a full-screen view.
From the Music Assistant UI
Select Your Dashie Speaker
In the Music Assistant UI, click the speaker/player icon at the bottom of the screen. Select your Dashie device as the active player.
Browse and Play
Browse your library, search for music, or explore radio stations. Click play on any track, album, or playlist and it will stream to your Dashie tablet.
With Voice Commands
If you have voice control set up on your Dashie, say "Hey Dashie, play some jazz" or "Hey Dashie, play Taylor Swift" to start music. You can also use voice commands for playback control: "pause", "next song", "volume up", etc.
Speaker Groups
To play music across multiple rooms simultaneously, tap the speaker name on the music player card to open the speaker group drawer. Check the speakers you want to include — audio will be synchronized across all grouped speakers. Each speaker has its own volume slider so you can balance the levels per room.
Troubleshooting
Dashie doesn't appear as a speaker in Music Assistant
- Verify the Music Assistant server address is correct in Dashie settings (IP:port, e.g.
192.168.1.100:8095) - Make sure your Dashie tablet and Music Assistant server are on the same local network
- Check that Music Assistant version 2.7 or later is installed (Sendspin is built-in since 2.7)
- Try toggling the music player off and on again in Dashie settings, then restart
- Check the Music Assistant logs for Sendspin connection errors
Music plays but no sound from the tablet
- Check that the tablet volume is turned up (use the volume slider in the music player card or the device's physical buttons)
- Make sure no other app on the tablet has taken audio focus
- Verify the Dashie app is running (the Sendspin service runs as a foreground service while the app is open)
Audio is out of sync between grouped speakers
- Different devices have different hardware audio latencies. This usually improves after a pause/resume cycle
- Ensure all devices are on a stable WiFi connection — high latency or packet loss will affect sync
- In Music Assistant's player settings, you can adjust per-speaker sync offsets to fine-tune alignment
Music player card doesn't appear on screen
- The player card only appears when music is actively playing on your Dashie speaker
- Start playback from the Music Assistant UI first, then the card should appear automatically
- If you previously dismissed the player, tap the music note icon in the sidebar to bring it back
Stale or duplicate speaker entries in Music Assistant
- During initial setup, you may see duplicate entries if the app was restarted multiple times
- In the Music Assistant UI, go to Settings → Players, click the three-dot menu on the stale entry, and select Delete
Need More Help?
If you're still having trouble, contact us with details about your setup. For Music Assistant-specific issues, check the Music Assistant documentation or their Discord community.