Dashie has two pieces that plug into Home Assistant. Most users want both.
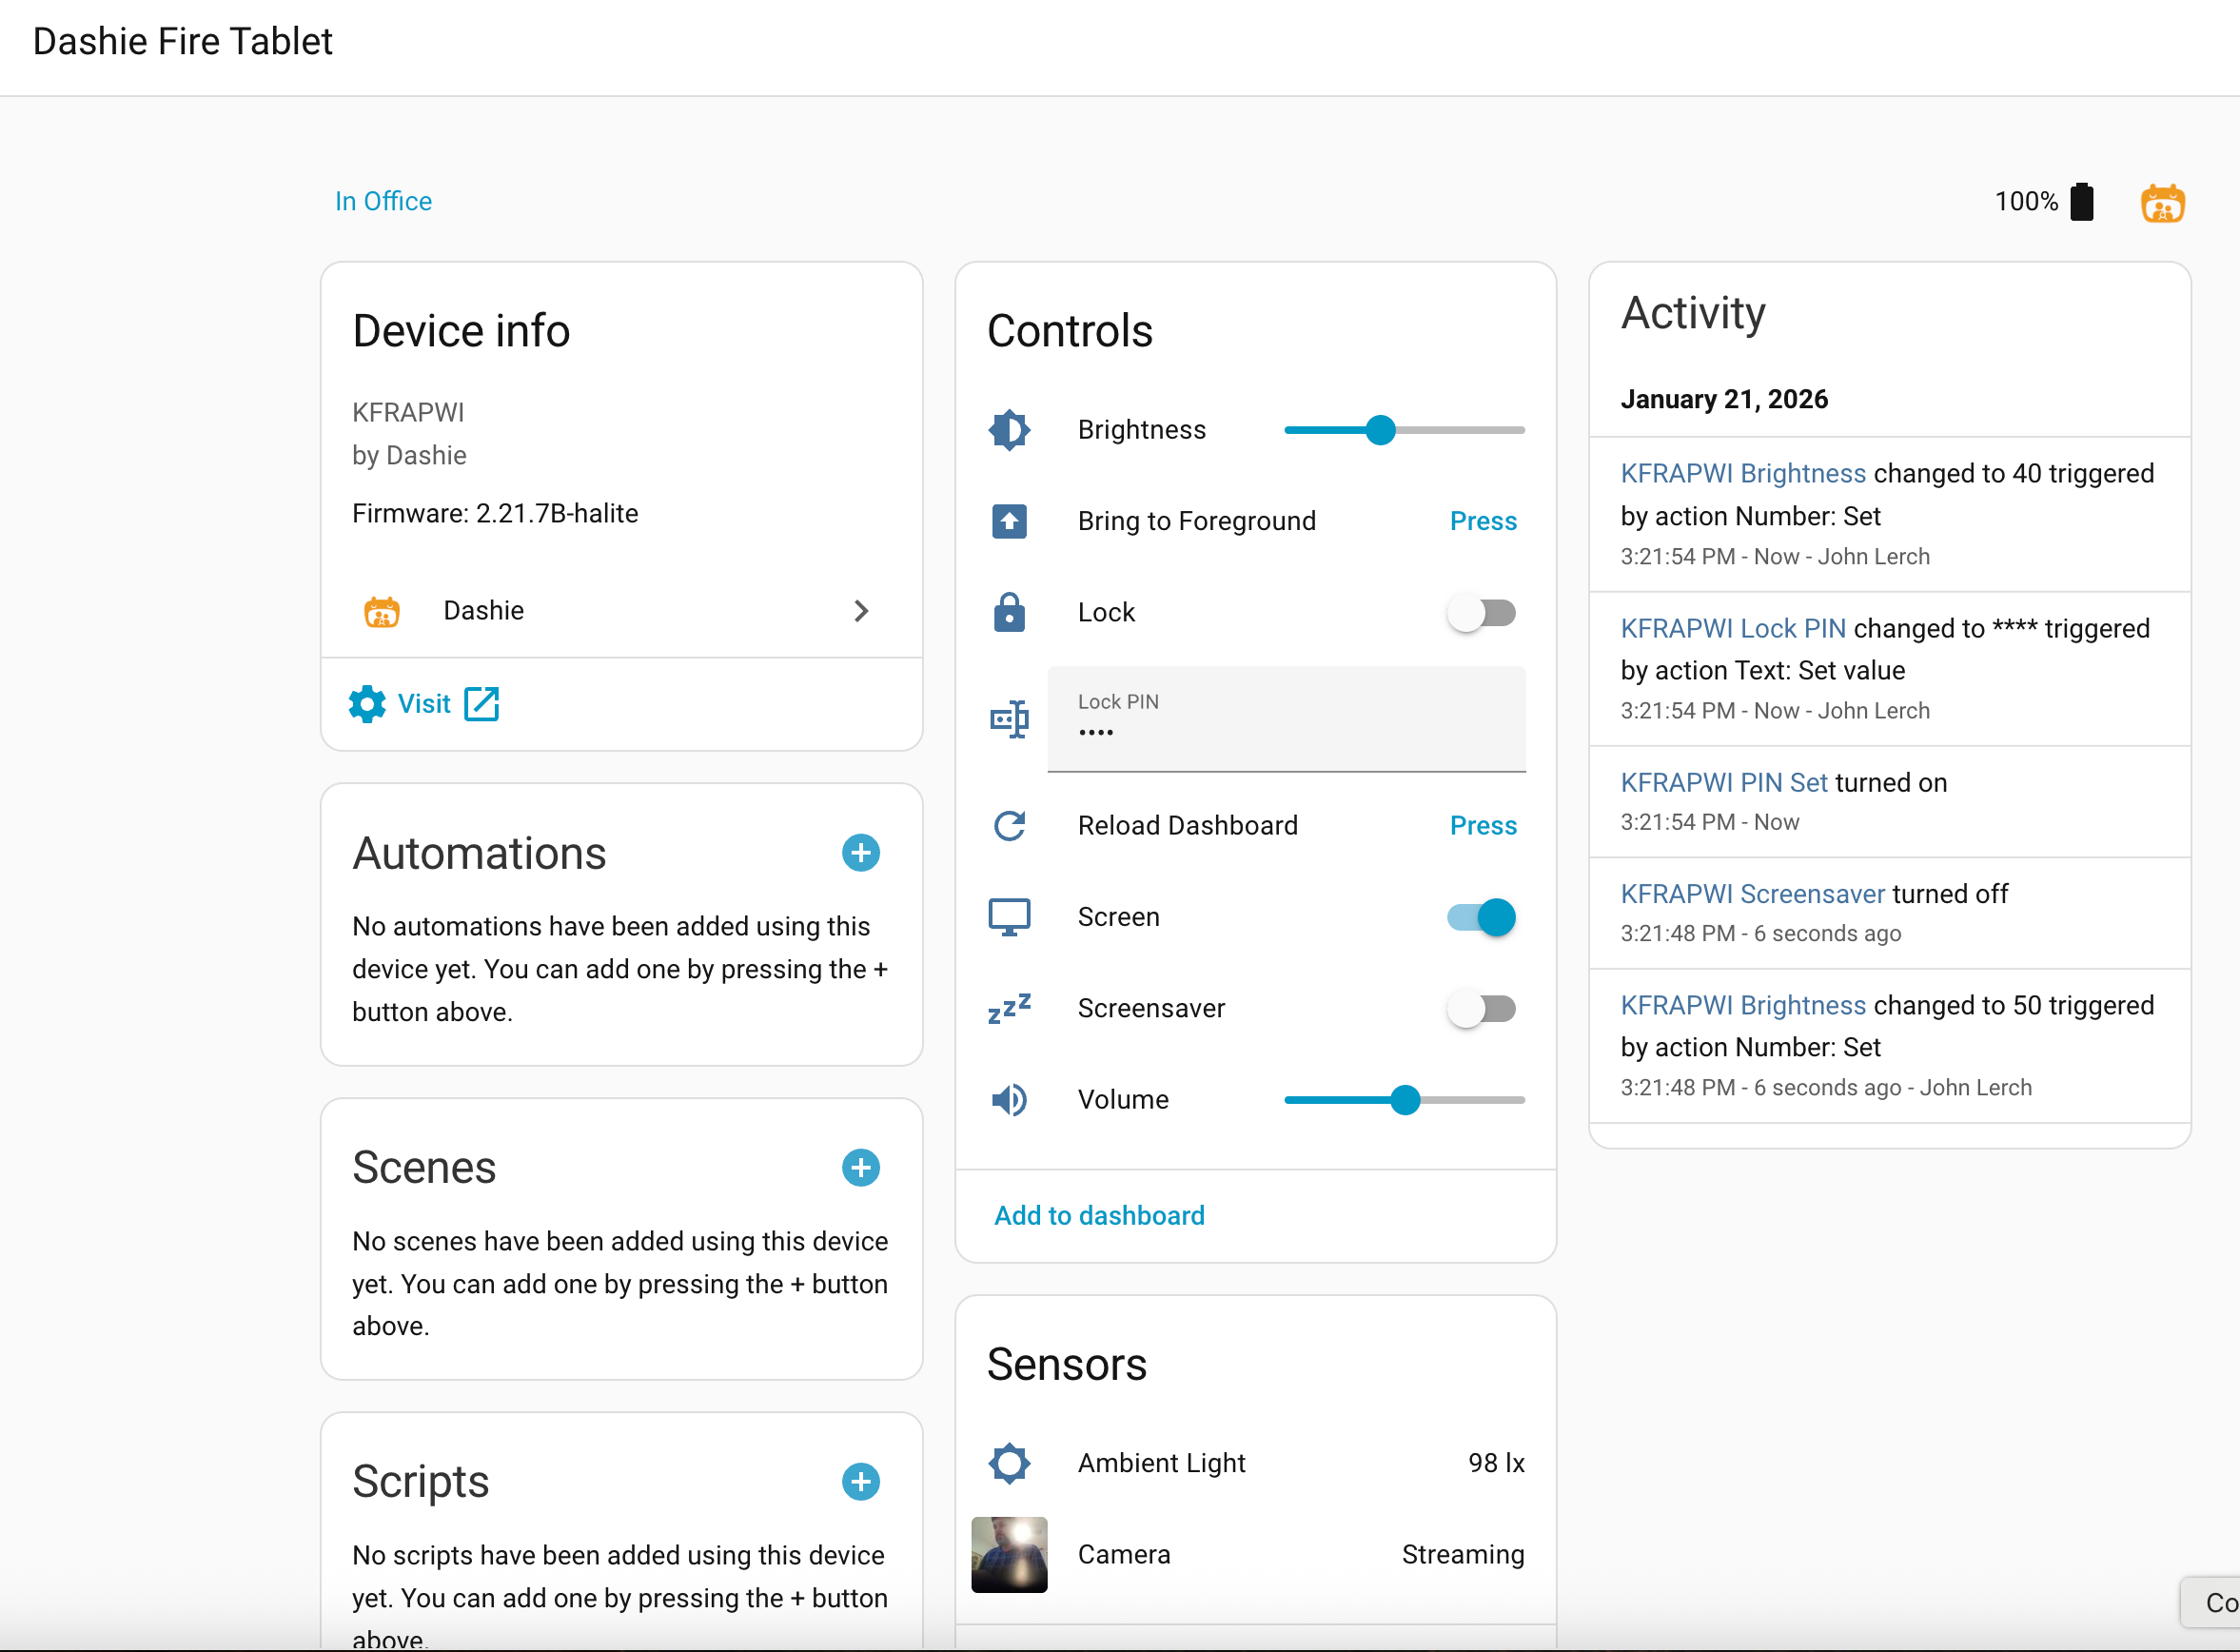
- Dashie Integration — registers each of your Dashie tablets in HA as a device with sensors and switches (battery, RAM, brightness, screen on/off, lock, camera stream, screensaver, and more). This is the core piece that makes Dashie controllable from HA dashboards and automations.
- Dashie Console app — hosts the Dashie management UI right inside HA, so you can manage your family, calendars, photos, AI personality, and per-device settings without leaving HA. Optional, but most users want it. (Requires Home Assistant OS or Supervised — Container/Core installs can't run apps.)
This guide walks through both, in order. You can stop after Part 3 if you only want HA controls and don't need the Console.
What You Can Do
Control screen brightness and power, toggle dark mode, start photo screensavers, stream the camera to HA, use text-to-speech for announcements, lock/unlock the device, monitor battery and sensors, and build automations - like dimming at night, announcing doorbells, or enabling the camera when you leave home.
Prerequisites
For the Integration (Parts 1–3):
- Home Assistant 2023.5 or later
- Dashie installed on your Android device (version 2.21.0B or later)
- Both Home Assistant and Dashie on the same local network
- HACS installed (recommended) or access to Home Assistant's config folder
For the Console app (Part 4):
- Home Assistant OS or Home Assistant Supervised (apps require Supervisor — Container and Core installs can't run apps)
- A Dashie account — sign up at app.dashieapp.com/console
How It Works
The integration communicates directly with your Dashie device:
Dashie Integration
Port 2323
Android Device
Dashie runs a local REST API that Home Assistant polls for status and uses to send commands.
Part 1: Enable the API on Dashie
First, you need to enable the REST API on your Dashie device. This API allows Home Assistant to communicate with your device.
Open the Control Center
On your Dashie device, tap the ☰ menu at the bottom of the sidebar, then tap Control Center.
Open Dashboard config
Under Dashboard, tap Dashboard config. This page appears once Dashie is set up with a Home Assistant dashboard or a custom dashboard URL.
Enable the API
Under Device API, toggle Enable API to ON. This starts the REST API server on port 2323.
Set an API Password (Optional)
After enabling the API, a password field will appear. Setting a password is recommended for security, but optional for testing on a trusted home network.
Note Your Device's IP Address
The device's IP address is shown at the bottom of the Control Center (for example IP: 192.168.1.100).
You'll need this IP to add the device to Home Assistant.
Firewall Note
If your Android device has a firewall app, make sure port 2323 is allowed for incoming connections. Most home networks don't require any additional configuration.
Part 2: Install the Integration in Home Assistant
The Dashie integration needs to be installed as a custom component in Home Assistant. We recommend using HACS for the easiest installation and automatic updates.
Option A: Using HACS (Recommended)
HACS (Home Assistant Community Store) makes it easy to install and update custom integrations. If you don't have HACS installed yet, follow the HACS installation guide first.
Open HACS
In Home Assistant, click on HACS in the sidebar, then select Integrations.
Add Custom Repository
Click the three-dot menu (⋮) in the top right corner and select Custom repositories.
Enter Repository URL
In the dialog that appears:
• Repository: https://github.com/jwlerch78/dashie-ha-integration
• Category: Select Integration
Click Add.
Install Dashie
Close the custom repositories dialog. Click + Explore & Download Repositories. Search for "Dashie" and click on it. Click Download in the bottom right.
Restart Home Assistant
Go to Settings → System → Restart and click Restart. Wait for Home Assistant to come back online.
Future Updates
Once installed via HACS, you'll receive notifications when updates are available. Just click "Update" in HACS to get the latest features and fixes.
Option B: Manual Installation
If you prefer not to use HACS, you can install the integration manually. You'll need access to your Home Assistant config folder via Samba share, SSH, or the File Editor app.
Download the Integration
Download the Dashie integration from GitHub. Click the green "Code" button and select "Download ZIP".
Copy to Home Assistant
Extract the ZIP file. Copy the custom_components/dashie folder to your
Home Assistant config folder at config/custom_components/dashie.
Create the custom_components folder if it doesn't exist.
Restart Home Assistant
Go to Settings → System → Restart and click Restart. Wait for Home Assistant to come back online.
Manual Updates
With manual installation, you'll need to check GitHub periodically for updates and repeat this process to get new versions. We recommend HACS for easier maintenance.
Part 3: Add Your Dashie Device
Now that the integration is installed, you can add your Dashie device to Home Assistant.
Open Integrations
In Home Assistant, go to Settings → Devices & Services.
Add the Integration
Click + Add Integration in the bottom right corner. Search for "Dashie" and select it.
Enter Device Details
Enter your Dashie device's IP address and port (default: 2323). If you set a password, enter it as well.
Complete Setup
Click Submit. If successful, you'll see your device appear in the Dashie integration with its entities.
Auto-Discovery
Dashie broadcasts its presence on your network using mDNS/Zeroconf. Home Assistant may automatically discover your device and show a notification to add it. If you see this notification, just click "Configure" to add the device.
Part 4: Install the Dashie Console App (Optional)
The Dashie Console app puts the full Dashie management UI inside Home Assistant. From the Console you can manage your family, calendars, photos, AI personality, voice settings, and per-device preferences — all without leaving HA. You'll also see live device history charts (battery, RAM, Wi-Fi) and per-device control panels.
Apps need Home Assistant OS or Supervised
The Console app runs as a Home Assistant app (previously called add-ons). Apps require the Home Assistant Supervisor, which is included in Home Assistant OS and Home Assistant Supervised. If you're running HA Container or HA Core, apps aren't available — you can still use the integration above and manage your Dashie account at app.dashieapp.com/console in your browser.
Open the App Store
In Home Assistant, go to Settings → Apps (formerly "Add-ons"). Click the App Store button at the bottom right.
Add the Dashie Repository
Click the three-dot menu (⋮) in the top right of the App Store and select Repositories. Paste this URL:
https://github.com/jwlerch78/dashie-ha-app
Click Add, then close the dialog. A new "Dashie" section appears at the bottom of the App Store with the Dashie Console card.
Install Dashie Console
Click the Dashie Console card, then click Install. The first install pulls a Node.js base image and takes 3–5 minutes on a Raspberry Pi (faster on x86 hardware). The progress spinner won't show a percentage — just wait until it's done.
Configure and Start
Once installed, go to the Configuration tab. Confirm
supabase_env: production (the default) so the Console connects to
live Dashie. Save, then switch to the Info tab.
Toggle Show in sidebar on so you can reach the Console from HA's main sidebar. Then click Start.
Sign In
Click Open Web UI (or click "Dashie Console" in the HA sidebar). The Console will show a sign-in screen with a short code. Open app.dashieapp.com/auth on your phone or laptop, enter the code, and approve. You're in.
First-Time Console Tips
• Devices you added in Part 3 will appear in the Devices section automatically.
• Click any device card for live metrics, history charts (battery, RAM, Wi-Fi), and per-device settings.
• The Console auto-updates — when we ship a new version, just click Update on the
Dashie Console card in Settings → Apps.
Available Entities
Once your device is added, Home Assistant creates a comprehensive set of entities you can use in dashboards, automations, and scripts. These are organized into Controls (things you can change) and Sensors (things you can monitor).
Switches
| Entity | Description |
|---|---|
switch.dashie_screen |
Turn screen on/off |
switch.dashie_screensaver |
Start/stop the screensaver |
switch.dashie_lock |
Lock/unlock kiosk mode (hides settings) |
switch.dashie_dark_mode |
Toggle system dark mode |
switch.dashie_hide_sidebar |
Hide/show the sidebar menu |
switch.dashie_hide_tabs |
Hide/show the header tabs |
switch.dashie_keep_screen_on |
Prevent screen from turning off |
switch.dashie_auto_brightness |
Enable automatic brightness adjustment |
switch.dashie_start_on_boot |
Launch app when device boots |
switch.dashie_rtsp_stream |
Enable/disable RTSP camera stream |
switch.dashie_software_encoding |
Use software encoding for RTSP (vs hardware) |
Numbers
| Entity | Description |
|---|---|
number.dashie_brightness |
Set screen brightness (0-255) |
number.dashie_volume |
Set audio volume (0-100) |
number.dashie_zoom |
WebView text/zoom scaling (50-200%) |
Selects
| Entity | Description |
|---|---|
select.dashie_screensaver_mode |
Screensaver type: Dim, Black, URL, Photos, or App |
select.dashie_photo_folder |
HA Media folder for screensaver photos |
select.dashie_motion_wake_mode |
Motion detection mode: Disabled, Brightness Sensor, or Camera |
select.dashie_screen_off_behavior |
Screen off method: Black Overlay (fast wake, keeps connections alive) or Power Off Screen (real hardware off) |
Text Inputs
| Entity | Description |
|---|---|
text.dashie_dashboard_url |
Set the Home Assistant dashboard URL |
text.dashie_pin |
Set a 4-digit unlock PIN |
Buttons
| Entity | Description |
|---|---|
button.dashie_reload |
Refresh the dashboard |
button.dashie_foreground |
Bring app to foreground |
button.dashie_restart |
Restart the Dashie app |
button.dashie_clear_cache |
Clear the WebView cache |
button.dashie_refresh_webview |
Refresh the WebView |
button.dashie_clear_storage |
Clear WebView local storage |
Sensors
| Entity | Description |
|---|---|
sensor.dashie_battery |
Battery level (0-100%) |
sensor.dashie_ambient_light |
Light sensor reading in lux |
sensor.dashie_wifi_signal |
WiFi signal strength (0-100%) |
sensor.dashie_storage_free |
Available storage space |
sensor.dashie_current_page |
Currently displayed URL |
sensor.dashie_device_id |
Unique device identifier |
sensor.dashie_android_version |
Android OS version |
sensor.dashie_app_version |
Dashie app version |
sensor.dashie_ram_usage |
RAM usage percentage |
sensor.dashie_camera_frame_rate |
RTSP stream frame rate |
sensor.dashie_camera_resolution |
RTSP stream resolution |
sensor.dashie_camera_stream_url |
RTSP stream URL when active |
Binary Sensors
| Entity | Description |
|---|---|
binary_sensor.dashie_plugged_in |
Whether device is charging |
binary_sensor.dashie_screensaver_active |
Whether screensaver is running |
binary_sensor.dashie_pin_set |
Whether unlock PIN is configured |
binary_sensor.dashie_device_admin |
Whether device admin/owner is active |
RTSP Camera Streaming
Dashie can stream video from your device's front camera as an RTSP feed, turning your tablet into a security camera or video intercom. This works great for monitoring a room or as a doorbell camera integration.
Use Cases
Use the camera stream to check in on pets, monitor a baby's room, see who's at the door, or add a video feed to your Home Assistant dashboard. The stream can be viewed in any RTSP-compatible player or added directly to HA as a camera entity.
Enabling Camera Streaming
Enable in Sidebar
On your Dashie device, open the sidebar and find the CAMERA section. Toggle Enable RTSP Stream to ON.
Configure Stream Settings
Adjust the resolution, FPS, and bitrate based on your needs:
• Resolution: 480p (default), 720p, or 1080p
• FPS: 15-30 frames per second
• Bitrate: 1-5 Mbps (higher = better quality, more bandwidth)
Note the Stream URL
The sidebar will show your RTSP stream URL, typically:
rtsp://DEVICE_IP:8554/camera
You'll use this URL to add the camera to Home Assistant.
Adding to Home Assistant
Add the camera stream to Home Assistant using the Generic Camera integration:
Add Generic Camera
Go to Settings → Devices & Services → Add Integration and search for Generic Camera.
Configure Stream URL
Enter the RTSP stream URL from your Dashie device:
• Stream Source: rtsp://192.168.x.x:8554/camera
• Still Image URL: Leave blank (or use the camshot API endpoint)
Give it a friendly name like "Kitchen Dashie Camera".
Performance Note
Running the camera stream uses additional battery and processing power. For wall-mounted tablets that are always plugged in, this isn't a concern. For battery-powered devices, consider only enabling the stream when needed via automation.
Camera API Commands
You can also control the camera stream via the REST API or Home Assistant services:
| Command | Description |
|---|---|
startRtspStream |
Start the RTSP camera stream |
stopRtspStream |
Stop the RTSP camera stream |
getRtspStatus |
Get stream status, URL, and connected client count |
getCamshot |
Capture a single JPEG image from the camera |
setRtspResolution |
Set resolution (width/height) - requires stream restart |
setRtspFps |
Set frame rate (10-30) - requires stream restart |
setRtspBitrate |
Set bitrate in bps - requires stream restart |
Services
Beyond entities, Dashie exposes several services you can call from automations and scripts for text-to-speech, audio playback, and on-screen notifications.
Text-to-Speech
Make your Dashie device speak announcements using Android's built-in TTS engine:
service: rest_command.dashie_tts
data:
  text: "Dinner is ready!"
To set this up, add a REST command to your configuration.yaml:
rest_command:
  dashie_tts:
    url: "http://DEVICE_IP:2323/?cmd=textToSpeech&text={{ text }}&password=YOUR_PASSWORD"
    method: GET
  dashie_stop_tts:
    url: "http://DEVICE_IP:2323/?cmd=stopTextToSpeech&password=YOUR_PASSWORD"
    method: GET
Audio Playback
Play audio files or streams through the device speakers:
rest_command:
  dashie_play_sound:
    url: "http://DEVICE_IP:2323/?cmd=playSound&url={{ url }}&password=YOUR_PASSWORD"
    method: GET
  dashie_stop_sound:
    url: "http://DEVICE_IP:2323/?cmd=stopSound&password=YOUR_PASSWORD"
    method: GET
On-Screen Messages
Display toast notifications on the device screen:
rest_command:
  dashie_message:
    url: "http://DEVICE_IP:2323/?cmd=setOverlayMessage&text={{ text }}&duration={{ duration | default(3000) }}&password=YOUR_PASSWORD"
    method: GET
Then call it in automations:
service: rest_command.dashie_message
data:
  text: "Front door opened"
  duration: 5000
Screen Off Method (REST API)
You can also control the screen off method directly via REST commands. This is useful if you want a single automation call that both changes the method and turns off the screen:
rest_command:
  # Change the default screen off method (persists across calls)
  dashie_set_screen_off_method:
    url: "http://DEVICE_IP:2323/?cmd=setScreenOffMethod&method={{ method }}&password=YOUR_PASSWORD"
    method: GET
  # Turn off with a one-time method override (doesn't change default)
  dashie_screen_off:
    url: "http://DEVICE_IP:2323/?cmd=screenOff&method={{ method }}&password=YOUR_PASSWORD"
    method: GET
Valid method values: overlay (Black Overlay) or hardware (Power Off Screen).
Omitting method from screenOff uses the current default.
Example Automations
Dim Screen at Night
Automatically reduce brightness when it gets dark:
alias: "Dashie - Dim at Night"
trigger:
  - platform: sun
    event: sunset
action:
  - service: number.set_value
    target:
      entity_id: number.dashie_brightness
    data:
      value: 30
Turn Off Screen When Away
Turn off the Dashie screen when everyone leaves home:
alias: "Dashie - Screen Off When Away"
trigger:
  - platform: state
    entity_id: zone.home
    to: "0"
action:
  - service: switch.turn_off
    target:
      entity_id: switch.dashie_screen
Wake Screen on Motion
Turn on the Dashie screen when motion is detected nearby:
alias: "Dashie - Wake on Motion"
trigger:
  - platform: state
    entity_id: binary_sensor.hallway_motion
    to: "on"
action:
  - service: switch.turn_on
    target:
      entity_id: switch.dashie_screen
Screen Off: Overlay by Day, Hardware Off at Night
Use Black Overlay during the day for instant wake and reliable connections, then switch to Power Off Screen at night to save energy. This is especially useful on devices (like Xiaomi tablets) that drop WebSocket connections during hardware screen off:
alias: "Dashie - Overlay by Day, Off at Night"
trigger:
  - platform: time
    at: "07:00:00"
    id: morning
  - platform: time
    at: "23:00:00"
    id: night
action:
  - choose:
      - conditions:
          - condition: trigger
            id: morning
        sequence:
          - service: select.select_option
            target:
              entity_id: select.dashie_screen_off_behavior
            data:
              option: "Black Overlay"
      - conditions:
          - condition: trigger
            id: night
        sequence:
          - service: select.select_option
            target:
              entity_id: select.dashie_screen_off_behavior
            data:
              option: "Power Off Screen"
Start Screensaver at Night
Automatically start the photo screensaver in the evening:
alias: "Dashie - Photo Screensaver at Night"
trigger:
  - platform: time
    at: "21:00:00"
action:
  - service: select.select_option
    target:
      entity_id: select.dashie_screensaver_mode
    data:
      option: "photos"
  - service: switch.turn_on
    target:
      entity_id: switch.dashie_screensaver
Announce Doorbell
Use TTS to announce when someone rings the doorbell:
alias: "Dashie - Doorbell Announcement"
trigger:
  - platform: state
    entity_id: binary_sensor.front_door_doorbell
    to: "on"
action:
  - service: rest_command.dashie_tts
    data:
      text: "Someone is at the front door"
Auto-Adjust Brightness by Ambient Light
Automatically adjust screen brightness based on room lighting:
alias: "Dashie - Auto Brightness"
trigger:
  - platform: state
    entity_id: sensor.dashie_ambient_light
action:
  - service: number.set_value
    target:
      entity_id: number.dashie_brightness
    data:
      value: "{{ [[states('sensor.dashie_ambient_light') | int / 10, 100] | min, 20] | max }}"
Enable Camera When Away
Start the RTSP camera stream when everyone leaves home for security monitoring:
alias: "Dashie - Camera On When Away"
trigger:
  - platform: state
    entity_id: zone.home
    to: "0"
action:
  - service: rest_command.dashie_start_camera
mode: single
REST Command for Camera
Add this to your configuration.yaml for the camera automation above:
rest_command:
  dashie_start_camera:
    url: "http://DEVICE_IP:2323/?cmd=startRtspStream&password=YOUR_PASSWORD"
    method: GET
  dashie_stop_camera:
    url: "http://DEVICE_IP:2323/?cmd=stopRtspStream&password=YOUR_PASSWORD"
    method: GET
Low Battery Alert
Get notified when the Dashie device battery is running low:
alias: "Dashie - Low Battery Alert"
trigger:
  - platform: numeric_state
    entity_id: sensor.dashie_battery
    below: 20
condition:
  - condition: state
    entity_id: binary_sensor.dashie_plugged_in
    state: "off"
action:
  - service: notify.mobile_app
    data:
      message: "Dashie battery is at {{ states('sensor.dashie_battery') }}% - please plug it in"
Troubleshooting
Can't find Dashie in integrations
- Make sure you restarted Home Assistant after copying the files
- Verify the files are in
config/custom_components/dashie/ - Check Home Assistant logs for any error messages during startup
Connection failed when adding device
- Verify the API is enabled on your Dashie device
- Check the IP address is correct and the device is on the same network
- Try accessing
http://DEVICE_IP:2323/?cmd=deviceInfo&type=jsonin a browser to test - Make sure no firewall is blocking port 2323
Device shows as unavailable
- Check that Dashie is running on the device
- Verify the device hasn't changed IP address (consider setting a static IP)
- Restart the Dashie app or toggle the API off and on
Entities not updating
- The integration polls every 30 seconds by default
- Check Home Assistant logs for any API errors
- Verify the device is still responding to API requests
Device added but no entities appear
- Most common cause: The API is not enabled on the device. Go to the Dashie sidebar → HOME ASSISTANT section → Toggle Enable API to ON
- Test the API by opening
http://DEVICE_IP:2323/?cmd=deviceInfo&type=jsonin a browser - you should see JSON data - If the API test fails, try restarting the Dashie app
- Check Home Assistant logs (Settings → System → Logs) and filter for "dashie" to see any connection errors
- Try removing the device from Home Assistant and re-adding it after confirming the API is working
Need More Help?
If you're still having trouble, contact us with details about your setup and any error messages you're seeing. Include your Home Assistant version and Dashie app version.